Custom Search
Showing posts with label Desktop. Show all posts

Removing the windows taskbar clock

Do you know you can hide the Windows Taskbar Clock?

Here is the step by step tutorial to hide it.

  • Right click on the Taskbar and select Properties. Taskbar Properties
  • The Taskbar properties window will be opened. Now uncheck the Show the clock check box to remove the clock from windows Taskbar and click the Ok Button.

Taskbar Properties Window

  • Its done. Now there will be no clock in the Taskbar.

Taskbar clock hidden

  • To show the Clock again just Check the Show the Clock checkbox in above step.

Removing Recycle Bin from Windows Desktop/Explorer

Well, Think of the situation you have deleted some most personal/private files from your computer in your office, but you forget to empty the Recycle Bin. and some one get these files, It will be be nightmare.

So here comes the solution. Remove the Recycle Bin icon from your PC Temp or permanently (depends on your needs).

This setting removes the Recycle Bin icon from the desktop, from Windows Explorer, from programs that use the Windows Explorer windows, and from the standard Open dialog box.

This setting does not prevent the user from using other methods to gain access to the contents of the Recycle Bin folder.

Note: To make changes to this setting effective, you must log off and then log back on.

Now here is the step by step guide for removing Recycle Bin icon.

Click Start and then Click Run.
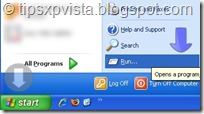
Start Button

  • Type gpedit.msc in Run, and click the OK button.

services.msc

  • The Group Policy Window will appear. Now click on the “+” sign of Administrative Templates( or double click) under User configuration in the left columns to expand it and select/click Desktop(see the image below).
  • Now double click on “Remove Recycle Bin icon from desktop” to open its properties. (as shown in the picture)
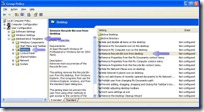
deleting recycle bin desktop

  • Then select Enabled radio button from Remove Recycle Bin icon from desktop Properties and click the OK button. (as shown in the picture) and its done.
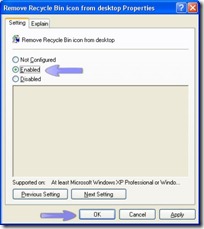
deleting recycle bin desktop2

To restore Recycle Bin icon to Desktop:

To get back Recycle Bin icon to Desktop just select Disabled or Not configured Radio button in above step.

Changing the location of Taskber in Windows

Before we continue lets know about Taskbar and Drag function.

What is Taskbar? : its the bar that contains the Start button and appears by default at the bottom of the desktop. You can click the taskbar buttons to switch between programs.

What is Drag? : To move an item on the screen by selecting the item and then pressing and holding down the mouse button while moving the mouse.

Now back to the topic

Taskbar taking up too much room?

You can move it to any convenient location

simply drag it to the sides, top or bottom of your screen!

draged at top of desktop

You might need to unlock the taskbar first.

Unlocking Taskbar

To do this, right-click any open area on the Taskbar,

then click Lock the Taskbar to unlock it.

Displaying, adjusting Picture size on Desktop

Any photo you have in your computer can be displayed as a background on the desktop.And you can also Adjust picture size on your desktop.

You can control the size of the picture you place on the desktop. You can:

  • Stretch the picture to fill the entire desktop.
  • Center the picture on your desktop.
  • Tile the picture across your desktop.

Here's how:

  • Click Start, and then click My Pictures.
  • Click the photo you want as your desktop background.
  • Under Picture Tasks, click Set as desktop background.
Changing Desktop Background
  • Minimize the My Pictures folder.
  • Right-click the picture you placed on the desktop, and then click Properties.
  • Under the Desktop tab, in the Position list, select Center, Tile, or Stretch and then click OK.
Changing desktop Background position

The image will be sized to your specification.

Related to: Windows XP Proffesional, Windows Tips, Windows Tricks, Windows learning, Windows How to's

Using My Pictures as Screen Saver in Windows

Windows XP makes it easy to customize the screen saver that's displayed when you take a break from the keyboard. Here's how:

Using your pictures as screen saver in XP

  1. Click Start, and then click Control Panel.
  2. Click Appearance and Themes.
  3. Under Pick a task, click Choose a screen saver.
  4. On the Screen Saver tab, in the Screen saver list, click My Pictures Slideshow.
  5. Click Settings.
  6. In the My Pictures Screen Saver Options dialog box, click Browse to locate the folder
containing the photos you want to display as a screen saver.

If you tire of the photos in one folder, you can return at any time to the settings and select a different folder.

Related to: Windows XP Proffesional, Windows Tips, Windows Tricks, Windows learning, Windows How to's

Desktop Cleanup Wizard in Windows

Shortcut icons are very convenient, but they have a way of cluttering your desktop. The Desktop Cleanup Wizard solves the problem! The wizard clears your desktop of icons you haven't clicked on during the past 60 days and sweeps them into a single desktop folder titled Unused Desktop Files. You can open the file to retrieve any of the icons (clicking on them places them back on your desktop), or you can easily send them to the Recycle Bin.

What is Desktop? its the on-screen work area on which windows, icons, menus, and dialog boxes appear.

To enable the Desktop Cleanup Wizard:

  • Click Start, and then click Control Panel.
  • Click Appearance and Themes.
  • Under Pick a task, click Change the screen resolution.
  • On the Desktop tab, click Customize Desktop.
  • Select the Run Desktop Cleanup Wizard every 60 days check box, and then click OK.

If you want to clean your desktop of unused files between the dates the wizard visits, simply follow steps 1 through 4 described above, and then click the button labeled Clean Desktop Now.

Showing Quick Launch on the Taskbar

If you have opened more than one program, you might like to display and use the Quick Launch bar. The Quick Launch bar makes it easy to access frequently used programs like Windows Media Player and your e-mail, and to open an Internet Explorer window. Windows XP loads several programs in the Quick Launch, including Show Desktop. One click on Show Desktop minimizes all the programs on your desktop. Another click restores them just as you'd left them.

What is taskbar? Its the bar that contains the Start button and appears by default at the bottom of the desktop.

To show Quick Launch on the taskbar:

  • If the Quick Launch bar is not displayed, right-click an empty area on the taskbar and click Properties.
  • On the Taskbar tab, under Taskbar appearance, select the Show Quick Launch check box and click OK.

After Quick Launch is displayed, click Show Desktop to minimize all open programs.

Changing the Look of Window Elements

Changing the look of individual items is only useful if you select Windows Classic in the Windows and buttons list on the Appearance tab. If you select a different option, the theme determines the appearance of your menus, fonts, icons, and other Window elements.

To change the look of Window elements:

  • click Start, click Control Panel, and then double-click Display.
  • On the Appearance tab, click Advanced.
  • In the Item list, click the element you want to change, such as Window, Menu, or Scrollbar, and then adjust the appropriate settings, such as color, font, or font size.
  • Click OK or Apply to save your changes.
  • Your changes are saved until you make further changes or choose a different theme.
  • The Font area will be unavailable for elements in the Item list that do not display text.

Setting or Changing a Screen Saver

Screen saver is A moving picture or pattern that appears on your screen when you have not used the mouse or keyboard for a specified period of time.

To set or change a screen saver:

  • click Start, click Control Panel,and then double-click Display.
  • On the Screen Saver tab, under Screen saver, click a screen saver in the list.
  • To view possible setting options for a particular screen saver, click Settings on the Screen Saver tab.
  • Specify the number of minutes in wait box after which screen saver starts.
  • Optionally, for extra security you may tick the check box on resume, display welcome screen. its great for those who leave their desk for the long time and don't want any intruder to get into their work.
  • Click Preview to see how the selected screen saver will appear on your monitor. Move your mouse or press any key to end the preview.
  • Click the Ok button.

After you select a screen saver, it will automatically start when your computer is idle for the number of minutes specified in Wait.

To clear the screen saver after it has started, move your mouse or press any key.

Changing Desktop screen resolution

Increase your screen resolution to view more information at one time. Everything will appear smaller on your screen, including text.

Decrease your screen resolution to increase the size of items on your screen. You will be able to view less information at one time, but text and other information will be larger.

A higher screen resolution reduces the size of items on your screen and increases the relative space on your desktop.

You can switch your screen resolution temporarily to 640 X 480 if you have games or other programs that are set to run at that resolution. To switch, right-click the game or program (on the desktop or on the Start menu), and then click Properties. Click the Compatibility tab, and then select the Run in 640x480 screen resolution check box. Your display reverts to its default resolution when you close the program.

Your monitor and video adapter determine how much you can change your screen resolution. You may not be able to increase the resolution above a certain level.

Changes to screen resolution affect all users that log on to the computer.

To Change your screen resolution:

  • Open Display in Control Panel. To open Display, click Start, click Control Panel, and then double-click Display.

  • On the Settings tab, under Screen resolution, drag the slider, and then click Apply.

Only the recommended screen resolutions will be listed. For additional settings, click the Advanced button on the Settings tab, click the Adapter tab, and then click List all Modes.

  • When prompted to apply the settings, click OK. Your screen will turn black for a moment.

  • Once your screen resolution changes, you have 15 seconds to confirm the change. Click Yes to confirm the change; click No or do nothing to revert to your previous setting.

  • Select the resolution, color level, and refresh rate you want.

Increasing the Size of Windows Text Fonts

If the text on your screen is too small for easy reading, you can increase the size of the fonts. This option enables you to enlarge the fonts used in window headers, icon labels, and menus.

  • Open Display in Control Panel. To open Display, click Start, click Control Panel, and then double-click Display.
  • Click on the Appearance tab.
  • in Font size drop down box, choose Large Fonts or Extra Large Fonts.
  • Click the OK button and you are done

Note:

The font size options are based on the current visual style, and color scheme. For some styles or schemes, you may only have one font size option.