Custom Search
Showing posts with label File Tasks. Show all posts

To show file and folder tasks in Windows Explorer

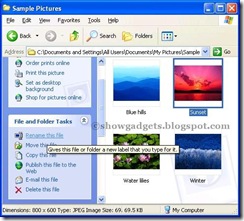
Every Windows folder provides easy access to common file and folder management tasks. When you open any folder on your computer, a list of hyperlinked tasks is displayed next to the folder contents. You can select a file or folder, and then click a task to rename, copy, move, or delete it. You can also send a file in e-mail or publish it to the Web.

By Default Windows do not show Common Tasks in Windows Explorer.

To show Common File and Folder Tasks in Windows Explorer.

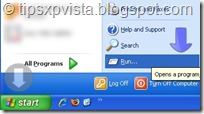
  1. Click Start, and then Click Run. Start Button
  2. Type Explorer in Run command box and click the OK button to open Windows Explorer. To Show common file and folder tasks
  3. Click the Close button  in the right corner of the Folders list to show Common File and Folder Tasks. Common File and Folder Tasks shown
Changing the Defualt program for opening a file

Sometimes you install a software(for example an image viewer) and it get associated with its supported formats automatically. Whenever you open those files (images,pictures etc) they will be opened by the new software you have just installed. But you may like to open them with your old software.

For example you have installed an image viewer/editor like Photo Perfect Express or FastStone Image viewer and it associated with all image types. Whenever you open an image file, it will be opened by above mentioned software's. But suppose you are satisfied with the windows default image viewer like Paint and Windows Picture and Fax viewer and you want to open Picture files always with them NOT with any other software.

Then this tip is for you.

To change the program that opens a file

  1. Right-click the file you want to open in a different program, and then click Properties. File Properties Menu
  2. On the General tab, click Change. Change the defualt Program for opening files
  3. Click the name of the program in which you want the file to open. Choosing defualt Program to open files

Notes:

  • This change affects all files that have the same file name extension as the file you selected. For example, if you change the program that opens a .jpg file, all .jpg files will open in this program.
  • You can also change the program that opens a file by right-clicking the file, clicking Open With, and then clicking the program name. If the program you want is not displayed, click Browse.

Copying Files/Folders to another location

Most Windows tasks involve working with files and folders. Windows uses folders to provide a storage system for the files on your computer, just as you use manila folders to organize information in a filing cabinet.

Folders can contain many different types of files, such as documents, pictures, videos, and programs. You can copy and move files from other locations, such as another folder, computer, or the Internet, to folders you create. You can even create folders within folders.

To copy files/folders to another location:

  • First go to the location of the file/folder which you want to copy.(For example you want to copy “Intel” folder from C Drvie)
  • Click the file or folder you want to copy.
  • Under File and Folder Tasks, click Copy this file or Copy this folder. Copying folder
  • Copy Items dialog box will appear.Select the destination Drive/Folder where you want to copy the file/folder and click on Copy button.

Copy Items

  • The file will be copied to your selected location.

Adding "My Computer" to Windows Taskbar for Faster access

If you access different files from your hard drive often then you know what you have to do every time. You have to open my computer then c:/d/ or other drive and then the folder in which file is stored.

What if you could access them without opening my computer?

that’s my today’s tip.

You could access all contents of My computer from your taskbar through a cascading menu.

Here is how:

  • Right click on Taskbar and point to Toolbars from Right click menu and then select New Toolbar.. from sub Menu

Creating New Toolbar

  • Now Create New Toolbar Dialogue box will appear. Select My Computer from it and click the OK button.

My Computer Toobar

  • This will create a cascading menu near the Clock, from where you can easily access just about anything on your System.

My Computer Cascading Menu

  • Its done.

How to Create a Shortcut on the Desktop

There are always some files which you use most often then others.You always need to open these files/folder by going to their original location.It may frustrate you.

What if you don't need to go to their original location to open them,access that file/folder in just one step

How? By creating a shortcut of that file/folder to your desktop.

Here is the step by step guide to create a shortcut to your desktop

  • First go to the location of the file/folder of which you want to create shortcut.
  1. Open My Computer.
  2. Double-click a drive or folder.
  • select the file/folder and right click on it.
  • select send to from Right click menu and then desktop(create shortcut)from sub menu.

Create desktop shortcut

  • Its done.

Now whenever you want to access them just click on its shortcut at your desktop and it will open instantly.

Note:

When you delete a shortcut to an item, the original item is not deleted. It still exists on your computer in its original location.

Delete files without moving them to Recycle Bin

Whenever you delete files they first go to recycle bin and then you have to open recycle bin to delete files permanently.

Suppose you have some extremely private files, you deleted them and You forget to empty the recycle bin, Then someone from your home/office who has access to that PC may restore them and open those files.

But you may delete files permanently without sending them to recycle bin.

There are two ways to do this. One is a selective method and second is permanent.

method 1: Its for those who only want to delete there chosen files permanently and other files goes to recycle bin.

  • To delete a file permanently first select the file.
  • After selecting it press Shift+delete key to delete it permanently.Deleting Files permanently

OR

  • Right click on the file and select delete from right click menu while holding shift key.
  • confirm the file deletion by pressing Yes button.

method 2: Its for those who always wanted to delete files permanently without sending them to recycle bin.To do so

  • Right click on Recycle Bin icon on your windows desktop.
  • Select Properties from Right Click menu. Recycle Bin Properties
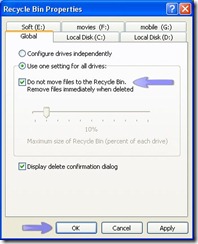
  • Check (√) the box named "Do not move files to the recycle bin.Remove files immediately when deleted".
  • click the OK button and its done

Recycle Bin permanent file deletion

Now every file will be deleted without moving to Recycle Bin.

Removing Recycle Bin from Windows Desktop/Explorer

Well, Think of the situation you have deleted some most personal/private files from your computer in your office, but you forget to empty the Recycle Bin. and some one get these files, It will be be nightmare.

So here comes the solution. Remove the Recycle Bin icon from your PC Temp or permanently (depends on your needs).

This setting removes the Recycle Bin icon from the desktop, from Windows Explorer, from programs that use the Windows Explorer windows, and from the standard Open dialog box.

This setting does not prevent the user from using other methods to gain access to the contents of the Recycle Bin folder.

Note: To make changes to this setting effective, you must log off and then log back on.

Now here is the step by step guide for removing Recycle Bin icon.

Click Start and then Click Run.

Start Button

  • Type gpedit.msc in Run, and click the OK button.

services.msc

  • The Group Policy Window will appear. Now click on the “+” sign of Administrative Templates( or double click) under User configuration in the left columns to expand it and select/click Desktop(see the image below).
  • Now double click on “Remove Recycle Bin icon from desktop” to open its properties. (as shown in the picture)

deleting recycle bin desktop

  • Then select Enabled radio button from Remove Recycle Bin icon from desktop Properties and click the OK button. (as shown in the picture) and its done.

deleting recycle bin desktop2

To restore Recycle Bin icon to Desktop:

To get back Recycle Bin icon to Desktop just select Disabled or Not configured Radio button in above step.

Renaming photos, folders in Windows

Shoe boxes are great - for storing shoes. But cramming them with photo envelopes makes it tough to find what you're looking for quickly. Windows XP takes the guesswork out of finding digital pictures by automatically naming photos according to the date you transfer them to your computer. This makes them easy to search for if you remember when you took them. To make it easier still, Windows XP enables you to rename individual photos or entire subfolders with memorable names, like "graduation".

Here's how:

Renaming photos or folders

  1. Click Start, and then click My Pictures.
  2. Click the photo or folder you want to rename.
  3. Do one of the following:
  • To rename a file, under File and Folder Tasks, click Rename this file.
  • To rename a folder, under File and Folder Tasks, click Rename this folder.

4.Type a new name for the photo or folder, and then press ENTER.

Renamimg a series of files at once

  • Open My Documents.

-To open My Documents, click Start, and then click My Documents. -If the series of files you want to rename is not located in My Documents or its sub folders, use Search to find it. To open Search, click Start, and then click Search.

  • Select the files you want to rename.

-To select consecutive files or folders, click the first item, press and hold down SHIFT, and then click the last item. To select nonconsecutive files or folders, press and hold down CTRL, and then click each item

  • On the File menu, click Rename.

  • Type the new name, and then press ENTER.

-To specify the starting number for the series, type the starting number in parenthesis after the new file name. The files in the series will be numbered in sequence starting with the number you type. For example, if you type Car (10), the other files will be named Car (11), Car (12), and so on.

-All of the files in the series will be named in sequence using the new name you type. For example, if you type Car, the other files in the series will be named Car(1), Car (2), and so on.