Custom Search
Showing posts with label Photo Tasks. Show all posts

Backup photos to a CD in Windows

Unlike the prints in your old shoebox, digital photos never fade or become disordered. And it is great to have instant access to dozens of snapshots on your computer. But there is a cost to your shutter-happiness: Digital pictures use more of your computer's memory than other files might. Windows XP makes backing up your favorite photos as easy as viewing them in the first place. A wizard guides you through the process of storing pictures on a CD. Using a CD frees up space on your computer. To make use of this feature, you'll need:

  • A recordable CD drive.
  • A blank CD onto which you can transfer your photos.
  • Some stores refer to recordable CDs as CDRs. Make sure you purchase recordable CDs that will work with your computer.

To store your Photos to CD:

  1. In the My Pictures folder, locate the photographs or folder containing the photos you want to transfer to a CD.
  2. Right-click the desired folders or photos. To select more than one photo, click the first one, and then hold down CTRL and click the other photos.
  3. Point to Send To, and then click Writable CD.
  4. Follow the instructions on your screen.

After copying your photos to a CD, you can delete them from your computer.
Renaming photos, folders in Windows

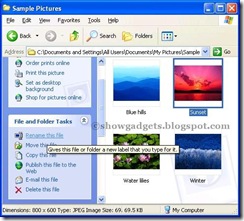
Shoe boxes are great - for storing shoes. But cramming them with photo envelopes makes it tough to find what you're looking for quickly. Windows XP takes the guesswork out of finding digital pictures by automatically naming photos according to the date you transfer them to your computer. This makes them easy to search for if you remember when you took them. To make it easier still, Windows XP enables you to rename individual photos or entire subfolders with memorable names, like "graduation".

Here's how:

Renaming photos or folders

  1. Click Start, and then click My Pictures.
  2. Click the photo or folder you want to rename.
  3. Do one of the following:
  • To rename a file, under File and Folder Tasks, click Rename this file.
  • To rename a folder, under File and Folder Tasks, click Rename this folder.

4.Type a new name for the photo or folder, and then press ENTER.

Displaying, adjusting Picture size on Desktop

Any photo you have in your computer can be displayed as a background on the desktop.And you can also Adjust picture size on your desktop.

You can control the size of the picture you place on the desktop. You can:

  • Stretch the picture to fill the entire desktop.
  • Center the picture on your desktop.
  • Tile the picture across your desktop.

Here's how:

  • Click Start, and then click My Pictures.
  • Click the photo you want as your desktop background.
  • Under Picture Tasks, click Set as desktop background.
Changing Desktop Background
  • Minimize the My Pictures folder.
  • Right-click the picture you placed on the desktop, and then click Properties.
  • Under the Desktop tab, in the Position list, select Center, Tile, or Stretch and then click OK.
Changing desktop Background position

The image will be sized to your specification.

Related to: Windows XP Proffesional, Windows Tips, Windows Tricks, Windows learning, Windows How to's

Using My Pictures as Screen Saver in Windows

Windows XP makes it easy to customize the screen saver that's displayed when you take a break from the keyboard. Here's how:

Using your pictures as screen saver in XP

  1. Click Start, and then click Control Panel.
  2. Click Appearance and Themes.
  3. Under Pick a task, click Choose a screen saver.
  4. On the Screen Saver tab, in the Screen saver list, click My Pictures Slideshow.
  5. Click Settings.
  6. In the My Pictures Screen Saver Options dialog box, click Browse to locate the folder
containing the photos you want to display as a screen saver.

If you tire of the photos in one folder, you can return at any time to the settings and select a different folder.

Related to: Windows XP Proffesional, Windows Tips, Windows Tricks, Windows learning, Windows How to's

Publishing photos on the Web in Windows

It doesn't take long to master the photo features of Windows XP. Then you're ready to post your photos to a Web site where family, friends, colleagues, and others can easily view them from any Internet-connected computer around the globe. Here's how:

Publishing photos on the Web

  • Click Start, and then click My Pictures.
  • Click the photo you want to publish.

To select more than one photo, press and hold down the CTRL key while clicking each photo. Release the CTRL key before clicking on the task you wish to perform.

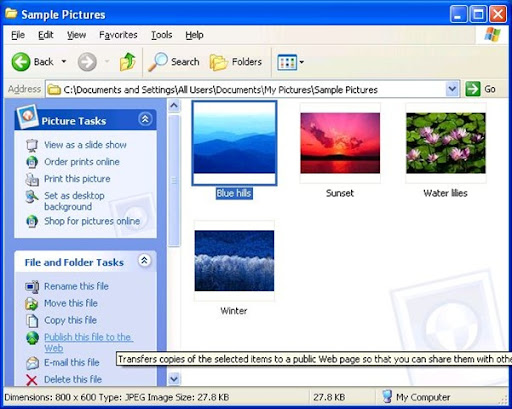
  • Under File and Folder Tasks, click Publish this file to the Web, and then follow the instructions on your screen.

If you selected more than one photo, click Publish the selected items to the Web. Follow the instructions on your screen.

Printing photos in windows

For social gatherings, nothing beats handing around actual photographs. Print your photos for special occasions or to share with family and friends who don't have e-mail. Windows XP makes it easy by supplying a wizard to automate this task. Here's what to do:

  • Click Start, and then click My Pictures. Click the photos you want to print.

To select more than one photo, press and hold down the CTRL key while clicking each photo. Release the CTRL key before clicking on the task you wish to perform.

  • Under Picture Tasks, click Print this picture, and then follow the instructions on your screen.

For the best results in color quality, try printing with the glossy photo paper used by professionals. Check your printer handbook for instructions. Application programs also are available for making the most of your photos by transforming them into calendars, greeting cards, and more. For example, Microsoft Greetings provides a range of features for customizing your own photos.

Ordering prints online:

If you don't have a printer, send your photos in e-mail to a Web-based photo-processing service. They'll print them for you on photo paper and then mail copies out to you or others you provide addresses for. This is also a great way of sharing photos with distant relatives and friends. Here's how:

  • Click Start, and then click My Pictures. Click the photo for which you want prints made.

To select more than one photo, press and hold down the CTRL key while clicking each photo. Release the CTRL key before clicking on the task you wish to perform.

  • Under Picture Tasks, click Order prints online, and then follow the instructions on your screen.

Send Photos by e-mail in Windows

Photos were made for sharing, and Windows XP provides a number of options to help you show off those magical moments. For instance, you can send photos stored in My Pictures by e-mail. Now you can share photos minutes after you take them by sending them in e-mail. It only takes a minute; here's how:

Simply:

  • Click Start, and then click My Pictures.
  • Click the photo you want to send.
  • Under File and Folder Tasks, click E-mail this file.
  • Windows XP automatically compresses photo files prior to sending them, which speeds
opening them on the other end.

Why does it sometimes take a long time for a photo sent in e-mail to appear on your or a recipient's monitor? Digital images of all kinds consist of tiny dots, called pixels. Digital photos often consist of thousands of pixels, an amount that can take extra time to pass through the telephone and other communication lines over which Internet information travels. Some Internet service providers occasionally limit the size of individual files and attachments. If you have trouble sending or receiving a group of digital photos, try sending each image separately; or contact your Internet Service Provider for advice.

Note: you need to setup your email client (ie Outlook Express, Microsoft Outlook, Mozilla Thunderbird, Windows Live Mail Desktop and other) before sending Photos by Email. and you need an Email address which provides Feature to use them with an Email client. (such as Gmail)

Rotating, Flipping, Zooming photos in Windows

What if you take a picture with the camera turned sideways to get a tall image into the frame?

No problem.

Use the toolbar in Windows Picture and Fax Viewer to flip the image right-way up.

With the toolbar you can also zoom in for a closer look at any area of a photo,

and enlarge an image to its actual size.

Finding your photos easily in Windows

Windows XP enables you to find photos on your computer quickly. No more hunting and pecking. That's because when you save a photo Windows XP automatically stores it in a folder named My Pictures, right on the Start menu.

Each time you transfer photos from your digital camera, Windows XP creates a new area, or subfolder, within My Pictures to contain them.

Windows XP also names the subfolder, but you can change the name at any time. (Remember, you're always in control!)

Clicking on the subfolder displays the contents in thumbnail-size images. Double-click any thumbnail to see a larger version of the photo in the preview pane in the Windows Picture and Fax Viewer program.

If you have network or Internet access, you can also save your photos to a network location or publish them directly to a Web site.

To select more than one photo in the folder, press and hold down the CTRL key while clicking each photo. Then drag and drop to move, copy, or delete the selected photos.

By the way, Windows XP can also store photos from other sources besides digital cameras, such as photos sent to you in e-mail or that you capture and save from the Web.

Installing Cameras in Windows

Windows XP is compatible with a broad range of the latest digital cameras. If your computer came with a USB (Universal Serial Bus) connection, simply plug the cable into your computer, and you're good to go. A wizard walks you through the rest of the steps to get the photos from the camera to your computer.

If your camera does not have a USB connection, it's easy for you to manually install the necessary software supplied by the manufacturer to enjoy the photo features of Windows XP.

Here's how:

  • Click Start, click Control Panel, and then click Printers and Other Hardware.
  • Click Scanners and Cameras.
  • Under Imaging Tasks, click Add an imaging device.
  • In the Scanner and Camera Installation Wizard, click Next.
  • Click the manufacturer and model from the Manufacturer and Models lists, and then click Have Disk.
  • Insert the disk containing the camera software, and then follow the instructions on the screen.

If your camera is not listed in the Scanner and Camera Installation Wizard, or if you don't have a disk containing the software, connect the camera to the computer and try locating compatible software by clicking on Add Hardware in step 2. Then follow the instructions on the screen.

You can also install the software controlling your camera or scanner, especially if it is not a USB (Universal Serial Bus) device, by using the Add Hardware Wizard in Control Panel. Afterward, connect the camera to the computer.