Custom Search
Showing posts with label Sharing. Show all posts

Enabling Remote Desktop in Windows XP

What is Remote Desktop?

With Remote Desktop, you can have access to a Windows session that is running on your computer when you are at another computer. This means, for example, that you can connect to your work computer from home and have access to all of your programs, files, and network resources as though you were sitting at your computer at work. You can leave programs running at work and when you get home, you can see your work desktop displayed on your home computer, with the same programs running.

When you connect to your computer at work, Remote Desktop automatically locks that computer so that no one else can access your programs and files while you are gone. When you come back to work, you can unlock your computer by pressing CTRL+ALT+DEL.

You can keep your programs running and preserve the state of your Windows session while another user is logged on. When that user logs off, you can reconnect to your session in progress.

Remote Desktop can be used in many situations, including:

  • Working at home. Access work in progress on your office computer from home, and have full access to all local and remote devices.
  • Collaborating. Access your desktop from a colleague's office to work together on projects such as updating a slide presentation or proofreading a document.
  • Sharing a console. Allow multiple users to maintain separate program and configuration sessions on a single computer, such as at a teller station or a sales desk.

To use Remote Desktop, you need:

  • A computer ("host" computer) running Windows XP Professional with Service Pack 2 or higher or Windows Server 2003 with Service Pack 2 or higher ("remote" computer) with a connection to a local area network (LAN) or the Internet.
  • A second computer ("client" computer) with access to the LAN via a network connection, modem, or virtual private network (VPN) connection. This computer must have Remote Desktop Connection installed.
  • Appropriate user accounts and permissions.

Now here is the step by step guide for enabling remote Desktop.

  • Click Start and then Click Run.

Start Button

  • Type gpedit.msc in Run, and click the OK button.

services.msc

  • The Group Policy Window will appear. Now click on the “+” sign of Administrative Templates( or double click) under Computer configuration in the left columns to expand it and then again click on the “+” sign of Windows Components under Administrative Templates to expand it.select/click Terminal Services(see the image below).
  • Now double click on “Allow users to connect remotely using Terminal Services” in the right column to open its properties. (as shown in the picture)

Group Policy Remote Desktop

  • Then select Enabled radio button from Allow users to connect remotely using Terminal Services Properties and click the OK button. (as shown in the picture).

Group Policy Enable Remote Desktop

  • Its done.

Removing/Restoring Shutdown button in StartMenu

Why you need to enable/Disable Shutdown Features of windows?

  • You want to enable the Shutdown Command

Because there are viruses which can disable Windows Shutdown. and you will not be able to Shutdown your Windows PC.

  • You want to Disable the Shutdown Command
  1. If you have a computer which should be always on. e.g. a Web Server.
  2. you want to prevent your Kids/friends/colleagues from shutting down the Windows because you are doing some important Takes, such as virus scanning, Disk Defragmenting, downloading or others, and shutdown can cause these tasks to start from beginning.

I will guide you step by step to Enable/disable Shutdown windows command.

  • Click Start and then Click Run.

Start Button

  • Type gpedit.msc in Run, and click the OK button. Running Group Policy Editor Command

  • The Group Policy window will open. Now click on the “+” sign of Administrative Templates( or double click) under User configuration in the left columns to expand it(see the image below).

  • Then Click/select Start Menu and Taskbar under Administrative Templates(see the image below).

  • Now double click on “Remove and prevent access to Shut Down command” to open its properties(see the image below) .

Restrict Shotdown Command

  • Now select “Enable” to Remove/Prevent access to Shutdown command and removing shutdown button from start menu OR Select Disabled to enable Shutdown command in windows/shutdown button in start menu, and click the OK button. (as shown in the picture below)

Disabled Windows Shutdown

Note: It will only works in Windows 2000/XP PRO, It will not work in XP Home edition.

Waiting for comments.

Turn on or off Fast user switch in Windows

If you hold a computer administrator account you can turn on or disable Fast User Switching. Here's how:

Turn on or off Fast User Switching in Windows XP
  • Click Start, and then click Control Panel.
  • Click User Accounts.
  • Under Pick a task, click Change the way users log on or off.
  • On the Select logon and logoff options page, select the Use the Welcome screen and the Use Fast User Switching check boxes.

Switching btw user accounts quickly in Windows

You're in the midst of writing an important document or composing a lengthy spreadsheet when someone sharing the computer asks to use it for an emergency. Sound familiar? Windows XP allows you to take those situations in stride. With the Fast User Switching feature in Windows XP, you can easily interrupt your work without closing your files. All you need to do is:

Fast User Switch in Windows XP

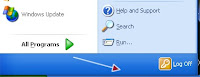
  1. Click Start, and then click Log off.

  2. Click Switch User.

Alternatively you can Switch User by pressing "Windows Logo Key + L"

Doing so displays the Welcome screen where another account holder can log on. When finished, that person can log off the same way, and you can simply log back on to find your open files just as you left them. What's more, if the other user accidentally shuts down the computer instead of returning to the Welcome screen, Windows XP automatically saves all open files and any application programs that are running, so that they are restored when the computer is restarted.

Changing account picture in Windows

For a personal touch, Windows XP can display a photo or other image beside the names of account holders on the Welcome screen. While an administrator of an account can assign pictures for all users, any account holder can choose his or her own picture.

Changing your account picture in Windows XP

Here's how:

  1. Click Start, and then Control Panel.
  2. Click User Accounts.
  3. Under Pick a task, click Change an account.
  4. On the Pick an account to change page, click your user account.
  5. On the What do you want to change about your account page, click Change my picture.
  6. On the Pick a new picture for your account page, click one of the pictures displayed, or click Browse for More Pictures.
  7. In the My Pictures folder, or in any of the folders in the Look in list, click the picture you want to use for your account, and then click Open.
  8. The picture will then be displayed, selected, on the Pick a new picture for your account page.
  9. Click Change Picture.

Saving and displaying a picture from Internet to user account

Why not be creative with your account picture? If you find a picture on the Internet that you want to display on the Welcome screen, Do the following:

Navigate to the picture you want to save. Right-click the picture, and click Save Picture As (this saves the picture in the My Pictures folder). In the File name box, type a name for the picture, and then click Save.

Now repeat the first five steps mentioned above and then

Click Browse for more pictures to navigate to the My Pictures folder. Select the picture you saved in step three, above, and click Open.

The new picture is then assigned to your user account.

Assigning a Password to user account in Windows

Unless they are protected by passwords, accounts listed on the Welcome page can be opened by anyone simply by clicking on them. Passwords help ensure information that you keep on the computer stays private and secure. By controlling access to your user account with a password, no one but you (and holders of computer administrator accounts, if yours is a limited account) can view or alter data in the account.

If you are the only holder of a computer administrator account for a shared computer, protecting the account with a password is especially important to prevent accidental or unauthorized changes to important system-wide settings and application software.

To protect a computer administrator account with a password:

create Password to user account in Windows XP

  1. Click Start, and then Control Panel.

  2. Click User Accounts.

  3. Under or pick an account to change, click the name of your account.

  4. On the What do you want to change about your account page, click Create a password.

  5. In the Type a new password box, type a password. In the Type the new password again to confirm box, type the new password again. If you want a reminder in case you forget your password, type a hint for yourself in the Type a word or phrase to use as a password hint box, and then click Create Password.

If you hold a limited user account, you can change your password by following steps 1 and 2 above, then:

  1. Under or pick an account to change, click your password-protected account.
  2. On the What do you want to change about your account page, click Change my password.
  3. In the Type your current password box, type your password. In the Type a new password box, type a new password for your account. In the Type the new password again to confirm box, type your new password again. If you want a reminder in case you forget your password, type a hint for yourself in the Type a word or phrase to use as a password hint box, and then click Change Password.

If you're a party of one - sole owner and user of a computer - you might still want to set up your computer with user accounts, naming you as computer administrator and protecting the account with a password. Doing so prevents casual access to the system by others if you leave your computer unattended while logged onto Windows XP, provided you log off from your account. For added security, disable guest access.

To Disable Guest access:

  • Click Start, and then click Control Panel.
  • Click User Accounts.
  • Under or pick an account to change, click Guest.
  • On the What do you want to change about the guest account page, click Turn off the guest account.

Creating User accounts in Windows

Setting up user accounts is easy, but you must remember to set up your own computer administrator account first. If you do not, you won't be able to set up the others. The names of the user accounts you set up appear listed on the Welcome screen (Welcome Screen is the first screen that appears when you log onto Windows XP. The Welcome page lists the holders of all accounts) and individually on each account holder's Start menu (Start Menu is a menu containing important and frequently used programs, folders and utilities. to open the Start Menu, click the Start button on the Taskbar ).

Note: This description and procedure applies only to users of Windows XP Home Edition and to users of Windows XP Professional configured to link the computer to a workgroup or to a Domain.

To determine whether your computer is linked to a workgroup or to a Domain:

click Start, and then Right Click My Computer.

Click Properties from drop down menu that appears.

Click the Computer Name Tab.

To Set up a user account in a workgroup:

Click Start, and then click Control Panel.

Click User Accounts.

Under Pick a task, click Create a new account.

On the Name the new account page, type a name for the new account, and then click Next.

On the Pick an account type page, click the type of account you want to assign, and then click Create Account.

Notes:

  • The name you assign to the account is the name that will appear on the Welcome screen and the Start menu.
  • The first user you add to the computer must be assigned a computer administrator account.

To Set up a user account in a Domain:

  • Click Start, and then click Control Panel.
  • Click User Accounts.
  • Follow the instructions on the screen to add a new user.

Notes:

  • Add New User gives an existing domain user permission to use the computer.
  • You can only add existing domain users by using User Accounts. To add a new local user, on the Advanced tab, click the Advanced button. In Local Users and Groups, click Users, and then on the Action menu, click New User.
  • You should not add a new user to the Administrators group unless the user will perform only administrative tasks.

Types of User accounts in Windows

User Accounts offers personalized settings and preferences for everyone who uses the computer. There are three types of user accounts:

1. Computer Administrator account:

This allows the holder unlimited power to modify the computer in any way, and - importantly - to view and alter the contents of all other accounts. Generally, only one user of a shared computer holds a computer administrator account - the boss! A person with a computer administrator account can, among other things:

Create and delete other user accounts on the computer. Change any user's account name, picture, password, and account type. Install and uninstall software and hardware. Change all system-wide settings.

However, the holder of a computer administrator account cannot change his or her account type to any other unless at least one computer administrator account remains. This ensures there is always someone able to fully operate the computer.

2. Standard account:

This account type is available only to users of Windows XP Professional using computers in a domain environment. With a standard account, a user can:

Install and uninstall software and hardware, provided doing so does not alter computer settings restricted by the holder of a computer administrator account. Create, change, or remove the account password. Change the account picture.

3. Limited account:

Assigning limited user accounts is an effective way to prevent inexperienced or unauthorized users from changing computer settings or deleting important files. Holders of limited accounts can only:

Create, change or delete their account password. Change their account picture.

Guest access:

The guest access feature of Windows XP allows someone who is not a regular user of the shared computer to operate it as if he or she holds a limited account. Guest access is not protected by a password. Using Guest access makes it easy for visitors to log on quickly to check e-mail, browse the Internet, write and print documents, and perform similar activities.